Plugin focus: Generating signatures for Nim and other non-C programming languages

This is a guest entry written by Holger Unterbrink from Cisco Talos. His views and opinions are his own and not those of Hex-Rays. Any technical or maintenance issues regarding the code herein should be directed to the author.
Adversaries are increasingly writing malware in programming languages such as Go, Rust, or Nim, likely because these languages present challenges to investigators using reverse engineering tools designed to work best against the C family of languages.
It’s often difficult for reverse engineers examining non-C languages to differentiate between the malware author’s code and the language’s standard library code. In the vast majority of cases, HexRay’s Interactive Disassembler (IDA) has the out-of-the-box capability to identify library functions or generate custom signatures and solve the issue.
But for Nim, generating signatures is distinctly more difficult. The techniques described in this blog post focus on how to overcome the challenges associated with generating a signature file for the Nim programming language. However, these techniques can easily be applied to other languages or situations where malware authors use special and uncommon compiler switches to make standard library profiling more challenging for investigators.
This blog starts from scratch in detailing the issues associated with generating signatures for Nim. If you are already familiar with FLIRT and just interested in the solution, you can skip to the “Our fully automated solution” section. All scripts of the fully automated solution can be found here.
The problem: Too many code variations
A reverse engineer’s main goal is to understand the logic behind a certain malware sample or, in other words, what the sample is designed to accomplish. IDA makes this task much easier by resolving standard library functions like ‘memcpy’ by using the Fast Library Identification and Recognition Technology (FLIRT), which is essentially a binary signature for the bytes of a function.

For common libraries and compilers, IDA comes with FLIRT signatures out of the box. You can see a list of the default FLIRT signatures by opening the ‘File/Load File/FLIRT Signature file…’ menu in IDA.

The problem here is, like with any static signature, that machine code has hundreds of options to do the same thing with different instructions. The way in which machine code is produced is heavily dependent on the compiler and compiler switches. For example, if a user was to compile the OpenSSL library, a certain function in this library can have different machine code bytes depending on which compiler, version of the compiler, version of the library, and compiler flags are used. Due to this complexity, IDA will likely never provide FLIRT signatures for all libraries and all possible combinations.
The same issue as described above occurs when investigating samples that have statically compiled libraries embedded that were compiled with uncommon compiler switches. An investigator may see thousands of functions that do not resolve automatically in this case, and it is easy to get lost in analyzing standard library functions instead of the code the malware author wrote.
The standard solution: How to generate FLIRT signatures
To address this issue, HexRays Fast Library Acquisition for Identification and Recognition (FLAIR) toolkit provides the ability to generate custom FLIRT signatures. A reverse engineer using this toolkit needs to find out which compiler, library version and compiler switches the adversary used. IDA, PE/Packer tools like DIE, or string extraction tools like Flare-floss can help with that. Usually, you want to look for library version strings or functions introduced in certain releases of the library of interest. Alternatively, once you identify the library used, an investigator can compile the library with different switches and/or versions and compare the result with the malware sample by using tools like Diaphora. Once the library version is determined, even if it is a stand-alone library like OpenSSL or SQLite3, or a programming language runtime library (RTL), you can start compiling it with the desired compiler switches and generate FLIRT signatures.
Standard steps for generating FLIRT signatures
Investigators must follow a number of standard steps to generate FLIRT signatures. First, the FLAIR toolkit has to be downloaded from the Hex-Rays download center. This toolkit can be unpacked to a directory of choice. Then, change to the flair <IDA Version> directory. In this directory, you can find several helpful text files describing the different tools:

In theory, the process of building a FLIRT signature is straightforward. From the library of interest, for example, the runtime library of the programming language, you need to generate a pattern file (.pat) with one of the pattern tools, like ‘pcf.exe’. There are multiple tools for multiple file formats. You can then use the ‘sigmake.exe’ tool to generate the final signature file from one or more pattern files (.pat). You can concatenate pattern files with the plus sign (+). The compiled signature file needs to be copied to the IDA signature architecture directory e.g. C:\Program Files\IDA Pro <VERSION>\sig\pc. The pattern file is generated based on the library’s target architecture. For example, if you are using Windows and built a static library, the pattern file will be in COFF format and the pcf.exe (parsecoff) tool from the FLAIR toolkit would be used. A Linux-based example can be found here.
The signature file is a binary file that uses the file extension .sig, while the pattern file(s) is a text file that uses the extension .pat and can be read or edited in your text editor of choice. The format of a pattern file is described in the picture below:

The following will provide a theoretical example to demonstrate the steps for generating common FLIRT signatures. This example is only for demonstration purposes and would not actually work, as Nim doesn’t support static linking of the RTL. Even if Nim did support this, you would need to use the additional compiler switch ‘-dynlibOverrideAll’ to overwrite certain pragmas, an issue we will revisit later in this post. We are just using the command line below to make sure the RTL will compile and as an example that could be adapted to other languages or libraries.
Build the static library:
  # nim c  -d:release --opt:size --app:staticlib --out:nimrtl.lib .\nimrtl.nim
  ….
  62678 lines; 5.626s; 93.871MiB peakmem; proj:  C:\Users\hunte\.choosenim\toolchains\nim-1.6.12\lib\nimrtl.nim; out:  C:\Users\hunte\.choosenim\toolchains\nim-1.6.12\lib\nimrtl.lib [SuccessX]
Generate the pattern (.pat) file:
  # C:\tools\IDA\flair82\bin\win\pcf.exe .\nimrtl.lib
  C:\Users\hunte\.choosenim\toolchains\nim-1.6.12\lib\nimrtl.lib:  skipped 0, total 32
Build the signature file:
#C:\tools\IDA\flair82\bin\win\sigmake.exe -n"nim-rtl-1612" nimrtl.pat nim-rtl-1612.sig
Note: If there are collisions/overlaps in the pattern file(s), for example, two or more functions with the same bytes, ‘sigmake’ will generate an ‘.exc’ file and you will see something like this:
  nim-1612.sig:  modules/leaves: 449/503, COLLISIONS: 1
  See the documentation to learn how to resolve collisions.
The ‘.exc’ file will list the colliding signatures and you can either manually resolve the issue or just delete the four or five comment lines at the beginning of the ‘.exc’ file that start with a semicolon, and run the sigmake command again. The latter automatically resolves the collisions.
  # Copy the signature file to IDA signature directory (this needs to be done from an  elevated prompt):
  copy  ‘nim-rtl-1612.sig’ ‘C:\Program Files\IDA Pro 8.2\sig\pc’
Now, you can find the Nim signature in the list of available library modules in IDA (File/Load File/FLIRT Signature file…):

In IDA's output window you can see that the signature was loaded and applied:

Why these standard steps do not work with Nim
This is the point where an investigator would usually be done and all library functions would be resolved in IDA. Below is a quick Nim test application to check if the Nim functions are getting resolved properly:
t1.nim:
var  s1:string = "Hello "
var  s2:string = "World!"
var  s3:string = s1 & s2
echo s3
We are compiling t1.nim with the same compiler switches as we did for the Nim runtime library (RTL) above and stripping the symbols from the binary (--passL:-s) to make sure IDA doesn’t resolve the function names via symbol information in the PE file.
nim c -d:release --opt:size --passL:-s -o:"t1-release-size-strip.exe" t1.nim
When we load the executable into IDA and apply the Nim signatures, the amount of detected library functions in our test Nim program is much too low:
IDA Memory Graph before applying the signatures (See light blue ‘Library functions’)
![]()
IDA Memory Graph after applying the signatures (See light blue ‘Library functions’)
![]()
If we search for the echo function in IDAs functions window, there is none.

Let’s try to find the echo function in our sample by first browsing through the Nim initialization functions to get to the function where the code we wrote is executed. The Nim compiler works by translating Nim source code into an intermediate language or JavaScript, though the latter is out of scope for this blog. The intermediate language can be C, C++ or ObjectC. In this example, we demonstrate the default C code generation. Once the compiler has generated the intermediate C source code, it uses the platform’s compiler to build the executable. On Windows, the default compiler is MinGW. You can read more about this on Nim’s backend integration page and compiler user guide. Other Nim basics are covered in a tutorial here. Looking into the intermediate C code shows that there are several initialization routines before the author’s actual code starts at the NimMainModule function. For most executables written in Nim, the functions are in the following order: Main > NimMain > NimMainInner > NimMainModul

Unfortunately, in stripped Nim binaries like the one in the example, not all of the initialization routines are automatically resolved by IDA, but at least NimMain is usually detected by HexRay’s Lumina. We can search for this in the IDA’s function window and jump to NimMain. Alternatively, you can follow the path described in the picture below, starting at tmainCRTStartup. There are ‘lea rax, <NimMainInnerAddr> ’ and ‘call rax’ instructions, that are one click from the NimMainModule function.

Typically this path is the same for most cases, but it depends on the compiler switches and obfuscation techniques used by the malware author. Another trick to find NimMainModule is to check the Xrefs to ‘nimRegisterGlobalMarker’, as usually the function with most pointers to ‘nimRegisterGlobalMarker’ is ‘NimMainModule’. If you are dealing with real malware, it is also important to keep in mind that there is an intermediate C code. Nothing keeps the malware author away from modifying the initialization routines described above. In other words, execute malicious code before ‘NimMainModule’.
Unfortunately, once we found ‘NimMainModule’ we can see that the echo function from our source code was not resolved by default nor after we applied the Nim signature file from above. The function ‘sub_140001CE9’ in the screenshot below, is the echo function from the source code. At compile time it will be translated to the echoBinSafe function from the io.nim library, so from now we will use this name.

But why is it not resolved? If we look into the pattern file generated above, we can find the echoBinSafe function, indicating the signature is included in our signature file. The reason the function did not resolve is that, comparing the echoBinSafe function from the runtime library file nimrtl.lib to our test file’s t1-release-size-strip.exe, echoBinSafe function reveals they are similar but not byte compatible.
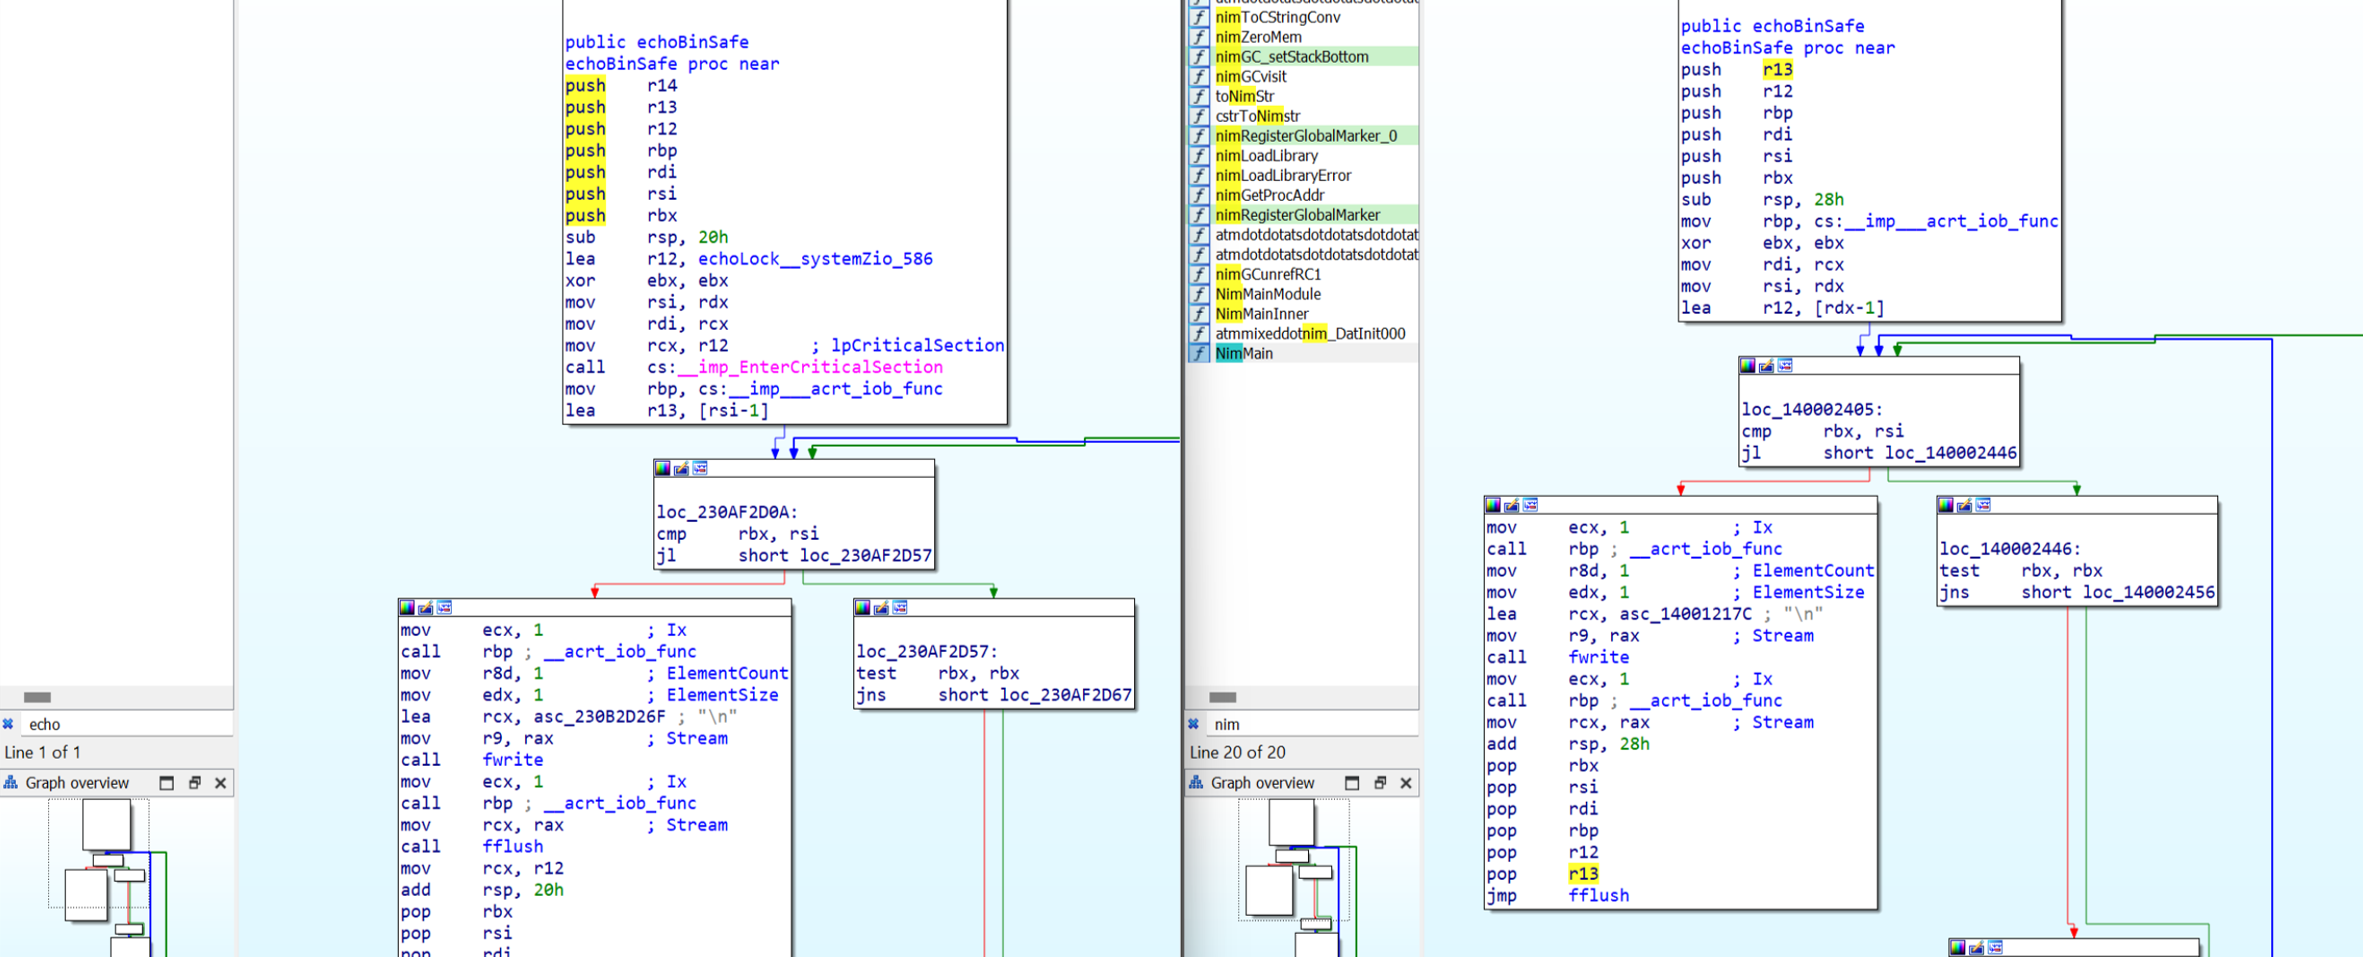
The stack initialization is different — nimrtl.lib has additional functions like EnterCriticalSection and other minor differences. This means that if we have a signature based on the bytes found in the echoBinSafefunction of the nimrtl.lib, it will not detect the version the compiler has built for the standalone executable t1-release-size-strip.exe.
The library source code contains pragmas for building it as a dynamic link library (DLL), so we would need to use ‘-dynlibOverrideAll’ to disable the dynlib pragma. Unfortunately, the Nim authors do not support building it as a static library:

The Python script workaround for generating a Nim executable including all runtime library functions
As the standard way of generating a Nim signature file doesn’t work, we designed a workaround by writing a Python script that parses all important Nim standard libraries, extracts all library functions and generates valid and compilable function calls from it. We tried a couple of other ways to convince the Nim compiler to generate the same source code, but all failed for different reasons. That was the reason why we decided to generate a large Nim source code file that includes all important Nim functions, compile it, and generate a pattern file by using the IDB2PAT plugin. This plugin can generate pattern files from an IDB or, in other words, from any executable you can load into IDA. The signatures for all symbols IDA can resolve are written into a .pat file. From there you can follow the way which we described above to generate a signature file .sig by using sigmake.exe.
As mentioned above, we endeavored to write a Python script that parses all the important Nim standard libraries, extracts all library functions and generates valid and compilable function calls from it. Given the complexity of Nim’s syntax, it took more than a week to write a parser that could generate valid and compilable source code from all the Nim libraries we wanted to include. Our work is similar to the NimP project, though this project is a bit outdated and we were not able to get it to work with the latest Nim version. To give you an idea of the complexity of the Nim syntax, below is a small subset of functions from the Nim standard libraries, all of which are valid functions:
func  spaces*(n: Natural): string
func  endsWith*(s: string, suffix: char): bool {.inline.}
func  invalidFormatString() {.noinline.}
func  `%`*(formatstr: string, a: openArray[string]): string {.rtl, extern:  "nsuFormatOpenArray".}
func  fromOct*[T: SomeInteger](s: string): T =
func  clamp*[T](val: T, bounds: Slice[T]): T {.since: (1, 5), inline.}
proc  initOptParser*(cmdline = "", shortNoVal: set[char] = {}, longNoVal:  seq[string] = @[]; allowWhitespaceAfterColon = true): OptParser =
proc  next*(p: var OptParser) {.rtl, extern: "npo$1".}
proc  `$`*(t: StringTableRef): string {.rtlFunc, extern: "nstDollar".}
proc  hasKey*(t: StringTableRef, key: string): bool {.rtlFunc, extern:  "nst$1".}
proc  enlarge(t: StringTableRef) =
proc  clear*(s: StringTableRef) {.since: (1, 1).}
proc  `<%`*(a, b: Rune): bool =
Though this complexity challenged our process, we created a working script that may be rewritten or cleaned up in due course. The script does not cover a few special cases, but it includes the majority of Nim standard library functions we were interested in. If a certain function is missing, it can be added to the source code the script is producing and compiled manually.
We used most libraries included in the Nim runtime and some others often used in Nim malware:
parseutils.nim, strutils.nim, parseopt.nim, parsecfg.nim, strtabs.nim, unicode.nim, ropes.nim, os.nim, osproc.nim, cstrutils.nim, math.nim, browsers.nim, io.nim.
The first version of our script generated one executable file per library file. Due to overlapping code and other dependencies, it would be difficult to generate one executable that includes all functions of all libraries. This means the script parses 12 standard library files, resulting in 12 executables that must be manually loaded into IDA and for every single one, the IDB2PAT plugin has to be executed.
In the second version of the script, we tried to automate this process by using IDA’s scripting functionality. Additional information on this and the issues we were facing with this approach can be found in Appendix B.
Our fully automated solution
To fully automate the signature-generating process and for educational purposes, we finally wrote three scripts: one generating the ‘fake’ source code file nim_rtl_builder.py, one COFF parser coffparser.py, and one using the COFF parser to generate signatures from all object files in the Nim cache directory obj2patfile.py. These object files are generated by the Nim compiler automatically at compile time. If you do not need signatures for special versions of the Nim runtime library, you can also download some signature files for Nim 1.6.12 here and skip the rest of the blog post. These signature files likely work for some other Nim versions too.
After execution, each script will give you instructions on what to do next. Start with the nim_rtl_builder.py script. It needs to be executed in the ‘<NIM_INSTALL_DIR>\lib\pure’ directory. Nim_rtl_builder.py will parse all functions from the library files mentioned above, then build a Nim source code file per library with function calls to these functions. For example, there is the following function in the library:
proc readAll*(file: File): string {.tags: [ReadIOEffect], benign.}
The parser script will analyze the parameters of the function, which in this case, is just the ‘file’ parameter of type ‘File’. The script then generates variables for the function parameters and as well a call to the function using these parameter variables. This source code would likely not execute or even do anything useful, but that is not our goal. Rather, we want to produce compilable source code to get a binary file that includes the bytes of the functions in the same way a normal Nim executable would have, so we can use it to generate our signatures. Below is an example of what a function in the generated source code file looks like. The first line is a comment describing the original function in the parsed standard library, followed by the generated variables and the function call. If a function returns a value in Nim, you have to use this value or otherwise discard it. This is what the discard instruction below is doing.
#proc readAll*(file: File): string {.tags:  [ReadIOEffect], benign.}
var fil682: File = open("test.txt",  fmReadWrite)
discard readAll(fil682)
You probably now have an idea of how complex it is to parse Nim functions. You need to understand the parameter types and the return value, because some standard library functions have return values, and some don’t. To make it even more complex, Nim comes with Metaprogramming features, like generics and others.
Before executing, you have to edit the nim_rtl_builder.py script and change some variables, of which only the first one is mandatory. You then must change to the \lib\pure directory of your Nim installation.

#cd <NIM_INSTALL_DIR>\lib\pureand execute
# ‘python <path_to_script>\nim_rtl_builder.py’
These steps build the executables from our ‘fake’ source code and with that, also the object files in the Nim cache directory, which we need for the next stage. A successful run would look like this:

Now you can parse all generated COFF object files .o for function symbols and bytes in the Nim compiler cache directory by executing the obj2patfile.py script. Again, you need to set the right paths in the header of the obj2patfile.py script.
![]()
Make sure you changed the working directory to the Nim cache directory before running the obj2patfile.py script. As a reminder, the cache directory name was set in the nim_rtl_builder.py script above.
# cd <NIM_CACHE_DIR> (e.g.  \nim-1.6.12\lib\pure\HU_nim_cache)
# python <path_to_script>\obj2patfile.py

Now run the sigmake.exe tool from the FLAIR toolkit to generate the final signature file — just copy and paste it from the output of the obj2patfile.py script.

There will be some collisions, which is expected. You need to delete the comments in the nim-1612.exc file that was generated by sigmake.exe.

Once the comments are deleted, run the sigmake.exe command again in the same way you did before. This will automatically resolve the collisions.

Now that you have a valid IDA signature file nim-1612.sig, the last step is to copy this over to the IDA signature directory (e.g. C:\Program Files\IDA Pro 8.2\sig\pc). You can load these signatures when you are analyzing a Nim executable in IDA via the File/Load File/FLIRT Signature file… menu.

We hope you enjoyed our journey of generating Nim signatures. Happy reversing!
Appendix A
Offensive Nim resources:
https://github.com/byt3bl33d3r/OffensiveNim/
https://s3cur3th1ssh1t.github.io/Playing-with-OffensiveNim/
https://ajpc500.github.io/nim/Shellcode-Injection-using-Nim-and-Syscalls/
https://github.com/ajpc500/NimlineWhispers
https://github.com/chvancooten/NimPlant
https://github.com/adamsvoboda/nim-loader
https://twitter.com/ShitSecure/status/1482428360500383755
https://github.com/icyguider/Nimcrypt2
https://github.com/aeverj/NimShellCodeLoader
https://ppn.snovvcrash.rocks/red-team/maldev/nim
https://assume-breach.medium.com/home-grown-red-team-bypassing-windows-11-defenses-with-covenant-c2-and-nimcrypt2-2557a0e3dfff
https://www.securityartwork.es/2022/01/12/bypassing-av-edr-with-nim/
https://sec-consult.com/blog/detail/nimpostor-bringing-the-nim-language-to-mythic-c2/
https://thehackernews.com/2021/03/researchers-spotted-malware-written-in.html
https://www.bleepingcomputer.com/news/security/trickbots-bazarbackdoor-malware-is-now-coded-in-nim-to-evade-antivirus/
https://research.checkpoint.com/2022/chinese-actor-takes-aim-armed-with-nim-language-and-bizarro-aes/
Appendix B
Why does automatically starting the plugin not work in IDA scripting mode?
The IDB2PAT plugin is missing some initialization methods and acts more like a standalone IDA Python script than a real plugin. This and some other IDA internals lead to the issue that we were only able to semi-automate the workflow. In this very special case, we did not find a way to fully automate the signature generation process by using IDA’s onboard tools, but we think it is worth including it here as this works for most other cases and it hopefully provides a good starting point for your own IDA automation tasks.
See below for our Python/IDC Script to automatically load the generated library into IDA and run the plugin without user interaction:
Python control script:
import os
import sys
import subprocess

if len(sys.argv) != 2:
          print("[ERROR] You have to give  me a filename to load into IDA")
          exit(1)

filename  = sys.argv[1]

def  built_pat(filename):

          ida_app = 'ida64'
      # ‘-A’  autonomous  mode. IDA will not display dialog boxes.
      # Default answer is always chosen
          ida_opt1 = '-A'
      # ‘-S’ Execute a script file (RunIDB2PAT.idc) when the database is opened
          ida_opt2 = '-SRunIDB2PAT.idc'
          ida_dir = 'C:\\Program Files\\IDA  Pro 8.2\\'
          exe_file_path = os.getcwd() + '\\' +  filename
          ida_filepath  = ida_dir + ida_app

          # This would be the full command to start and run the plugin automatically, but
          # due to the described issue we are disabling it and just loading the file into IDA
          # built_cmd  = [ida_filepath, ida_opt1, ida_opt2, exe_file_path]

          # Workaround: Removed ida_opt1 and ida_opt2 to be able to manually
          # execute the plugin.
          built_cmd   = [ida_filepath, exe_file_path]
          built_cmd_str = "  ".join(built_cmd)
          input(f"Should we execute: {built_cmd_str}  [Hit Enter to continue]?")
          return_code =  subprocess.call(built_cmd)

          if return_code == 0:
          print("Command executed successfully.")
          else:
          print(f"Command failed with return code {return_code}")
          exit(1)

print(f"Loading  File: {filename}")

built_pat(filename)

print("Done.")
IDC script ‘RunIDB2PAT.idc’:
#include <idc.idc>

static main()
{
  auto  ret;

  msg("Waiting for the end of the auto analysis...\n");
  auto_wait();
  msg("Auto analysis is finished, starting plugin ...\n");

// 1st try: Load and run plugin:
// This would work for standard plugins, but unfortunately, the idb2pat.py plugin
// is more acting like a standalone Python script and missing some plugin init routines
// ret  = load_and_run_plugin("C:\\Program Files\\IDA Pro 8.2\\python\\flare\\idb2pat.py",0);

// 2nd try: Another way of executing the Python code from the script via exec_python
// IDC function, unfortunately this doesn’t work either, some functions seem to get
// resolved after auto_wait(). This means the automation works and a .pat file is
// generated, but the signatures in the .pat file are not complete.
ret =  exec_python("idaapi.IDAPython_ExecScript(r'C:\\Program Files\\IDA Pro  8.2\\python\\flare\\idb2pat.py', globals())");

if  (ret == 0) {
  		 msg("[Success]  Return value: %d\n", ret);
  }
  else {
  	    msg("[Failed]  Error: %s\n", ret);
  }

// The following line instructs IDA to quit without saving the database
 process_config_directive("ABANDON_DATABASE=YES");
 qexit(0);
}